Magento2でエクステンションを作る方法(4)
この記事は公開から 1年以上が経過しています。現在の最新情報との整合性については弊社では一切の責任を負いかねます。
この記事は、Magento2でエクステンションを作る方法(3)の続きです。
前回の記事はこちら「タイトルと画像ファイルを保存」
管理画面から画像を保存し、それをフロントエンドにウィジェットを使って表示するエクステンションを作りたいと思います。
ウィジェットを使うことで、フロントの好きな場所に画像を表示することができます。
全体的なイメージ
- 左ナビにエクステンションのマークを表示
- グリッドを表示
- タイトルと画像ファイルを保存
- 保存した画像ファイルを表示するウィジェットを作成
DBのイメージ
- テーブル名:HelloImg
- カラム名:id, title, img
保存した画像ファイルを表示するウィジェットを作成
保存した画像ファイルを表示するウィジェットを作成したいと思います。
ウィジェットとは、レイアウトのことを知らない人でもある程度の自由さと柔軟さでパーツを画面上に配置できる機能のことを言います。
Veriteworks/etc/widget.xml
<widgets xmlns:xsi="http://www.w3.org/2001/XMLSchema-instance" xsi:noNamespaceSchemaLocation="../../../Magento/Widget/etc/widget.xsd">
    <widget id="helloimg_customwidget" class="Veriteworks\Helloimg\Block\Adminhtml\Helloimg\Widget\Chooser">
        <label translate="true">Helloimg Widget</label>
        <description>This is a Helloimg Widget</description>
        <parameters>
            <parameter name="helloimg" xsi:type="select" source_model="Veriteworks\Helloimg\Model\Status" visible="true" sort_order="10" >
                <label translate="true">Select Image</label>
            </parameter>
        </parameters>
    </widget>
</widgets>
ここで、管理画面からページで適当なページを作成し、ウィジェット挿入画面を確認してみてください。
プルダウンに上記で定義したウィジェットがあるはずです。

次に、保存した画像をここで選べるように実装を行います。
Veriteworks\Helloimg\Model\Status.php
- toOptionArrayメソッドで、保存した画像のタイトルの配列を返すことで、この配列の中から表示する画像を選ぶことができます。
- 添え字に画像IDを付与することで、helloimgパラメータで画像IDを取ってくることができます。
<?php
namespace Veriteworks\Helloimg\Model;
use Veriteworks\Helloimg\Model\ResourceModel\Grid\CollectionFactory;

/**
 * Class Status
 * @package Veriteworks\Helloimg\Model
 */
class Status implements \Magento\Framework\Option\ArrayInterface
{
    /**
     * @var CollectionFactory
     */
    protected $_gridCollectionFactory;

    /**
     * Status constructor.
     * @param CollectionFactory $gridCollectionFactory
     */
    public function __construct(
        CollectionFactory $gridCollectionFactory
    ){
     $this->_gridCollectionFactory = $gridCollectionFactory;
    }
    /**
     * get available statuses.
     *
     * @return []
     */
    public function toOptionArray()
    {
        $imageCollection = $this->_gridCollectionFactory->create();
        $imageTitleArray = array();

       foreach ($imageCollection->getItems() as $image) {
            $imageTitleArray[$image->getImgId()] = $image->getTitle();
        }
        return $imageTitleArray;
    }
}
もう一度、ウィジェット挿入画面を確認してください。
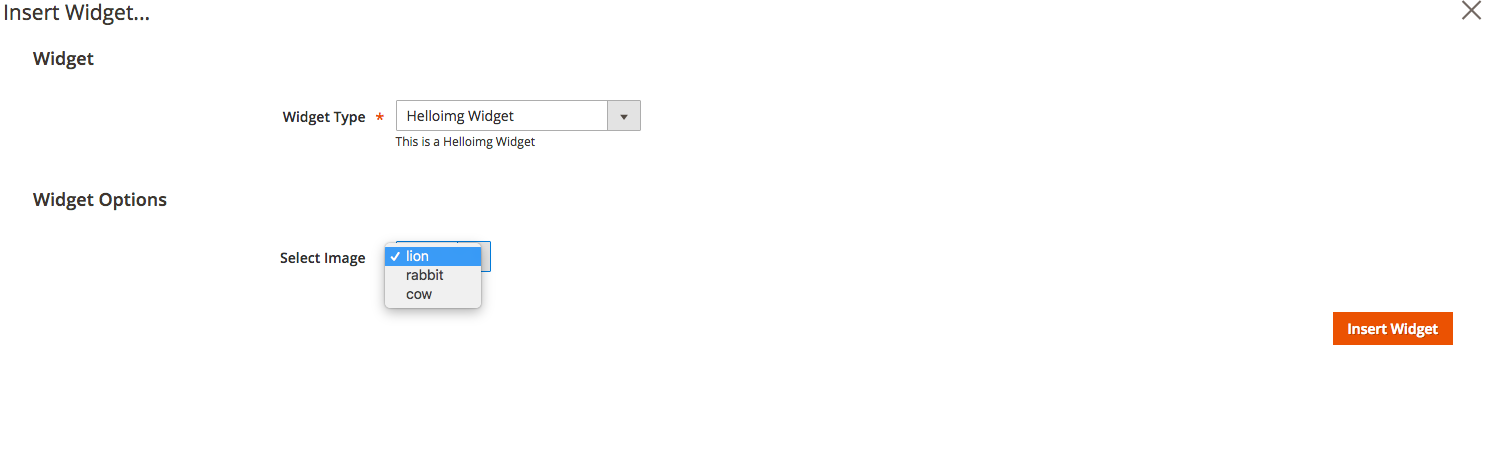
このように、保存した画像タイトルから選択が可能となります。
次に、ウィジェットを配置したあとのフロントエンド側での表示を作成します。
Veriteworks/Helloimg/view/frontend/templates/widget/helloimg.phtml
- フロントエンド部分のhtmlを書きます。
- $HOSTは適宜変更してください。
- $this->getData('helloimg')によって、選択した画像ファイルの画像IDが取得できます。
<?php
$HOST = 'http://192.168.33.10/pub/media/';
$imageCollection = $this->getImageCollection($this->getData('helloimg'));
?>
<?php
foreach ($imageCollection as $image) : ?>
    <span class="img">
        <img src="<?php echo $HOST.$image->getImage()?>" alt='<?php echo $image->getImgId() ?>'>
    </span>
<?php endforeach;?>
これではまだ表示されません。
$imageCollection=$this->getImageCollection($this->getData('helloimg'));
この行の実装を行います。
Veriteworks\Helloimg\Block\Adminhtml\Helloimg\Widget\Chooser.php
- このブロックでは、ウィジェットで選択した画像ファイルを取得するメソッドgetImageCollection()を書きます。
- 画像IDを取得し、それに対応する画像ファイルのみ返します。
<?php

namespace Veriteworks\Helloimg\Block\Adminhtml\Helloimg\Widget;
use Magento\Backend\Block\Template\Context;
use Veriteworks\Helloimg\Model\ResourceModel\Grid\CollectionFactory;

/**
 * Class Chooser
 * @package Veriteworks\Helloimg\Block\Adminhtml\Helloimg\Widget
 */
class Chooser extends \Magento\Framework\View\Element\Template implements \Magento\Widget\Block\BlockInterface
{

    /**
     * @var CollectionFactory
     */
    protected $_gridCollectionFactory;

    /**
     * Chooser constructor.
     * @param CollectionFactory $gridCollectionFactory
     * @param Context $context
     * @param array $data
     */
    public function __construct(
        CollectionFactory $gridCollectionFactory,
        Context $context,
        array $data = []
    )
    {
        $this->_gridCollectionFactory = $gridCollectionFactory;
        parent::__construct($context, $data);
    }


    /**
     *
     */
    protected function _construct(
    )
    {
        parent::_construct();
        $this->setTemplate('widget/helloimg.phtml');
    }

    /**
     * @param $image_id
     * @return mixed
     */
    public function getImageCollection($image_id)
    {
        $imageCollection = $this->_gridCollectionFactory->create()
            ->addFieldToFilter('img_id', array('in' => $image_id));

        return $imageCollection;
    }

}
ここで、キャッシュを消して画像がフロントから表示されているかチェックします。

表示できました。
ウィジェットを用いることで、フロントの好きな場所に管理画面から配置することが可能となりました。
まとめ
今回の記事では、管理画面から画像を保存し、それをフロントエンドにウィジェットを使って表示するエクステンションを作りました。
ウィジェットを使うことで、フロントの好きな場所に画像を表示することができます。
- エクステンションを有効・無効にする
- 管理画面左ナビに、エクステンションを表示する
- Ui componentを用いたグリッドの表示
- 画像の保存方法
- ウィジェットの作り方
などを習得できたかと思います。
これを応用して、例えばバナースライダーエクステンションの作成などに使っていただければ幸いです。
ソースコードはこちら https://github.com/Veriteworks/Helloimg.git