Magento2でエクステンションを作る方法(1)
この記事は公開から 1年以上が経過しています。現在の最新情報との整合性については弊社では一切の責任を負いかねます。
管理画面から画像を保存し、それをフロントエンドにウィジェットを使って表示するエクステンションを作りたいと思います。
ウィジェットを使うことで、フロントの好きな場所に画像を表示することができます。
全体的なイメージ
- 左ナビにエクステンションのマークを表示
- グリッドを表示
- タイトルと画像ファイルを保存
- 保存した画像ファイルを表示するウィジェットを作成
DBのイメージ
- テーブル名:HelloImg
- カラム名:id, title, img
左ナビにエクステンションのマークを表示
まず初めに、作成するエクステンションのモジュール名を決めてください。
今回は、Veriteworks_Helloimgというモジュール名で作成したいと思います。
Veriteworks/Helloimg/etc/module.xml
- modulename: 一般的に、会社名_エクステンション名というルールでモジュール名は決められます。
- setup_version: モジュールのバージョンです。
<?xml version="1.0"?>
<config xmlns:xsi="http://www.w3.org/2001/XMLSchema-instance"
		xsi:noNamespaceSchemaLocation="urn:magento:framework:Module/etc/module.xsd">
    <module name="Veriteworks_Helloimg" setup_version="0.0.1">
    </module>
</config>
Veriteworks/Helloimg/registration.php
- MODULE, にはmodule.xmlで定義したモジュール名を入れてください。
<?php

\Magento\Framework\Component\ComponentRegistrar::register(
\Magento\Framework\Component\ComponentRegistrar::MODULE,
'Veriteworks_Helloimg',
__DIR__
);
Veriteworks/Helloimg/etc/adminhtml/routes.xml
- URLのルーティングに関する処理を行います。
<config xmlns:xsi="http://www.w3.org/2001/XMLSchema-instance" xsi:noNamespaceSchemaLocation="urn:magento:framework:App/etc/routes.xsd">
    <router id="admin">
        <route id="adminhtml">
            <module name="Veriteworks_Helloimg" before="Magento_Backend" />
        </route>
        <route id="helloimg" frontName="helloimg">
            <module name="Veriteworks_Helloimg" />
        </route>
    </router>
</config>
Veriteworks/Helloimg/etc/adminhtml/system.xml
- ここで、設定ページで設定する項目を作成することができます。
- 今回は、画像を表示するか非表示にするかのプルダウンを作成しています。
<?xml version="1.0"?>
<config xmlns:xsi="http://www.w3.org/2001/XMLSchema-instance" xsi:noNamespaceSchemaLocation="urn:magento:module:Magento_Config:etc/system_file.xsd">
    <system>
        <tab id="veriteworks" translate="label" sortOrder="10">
            <label>Veriteworks</label>
        </tab>
        <section id="helloimg" translate="label" type="text" sortOrder="10" showInDefault="1" showInWebsite="1" showInStore="1">
            <tab>veriteworks</tab>
            <label>Hello Image</label>
            <resource>Veriteworks_Helloimg::veriteworks_helloimg</resource>
            <group id="general" translate="label" type="text" sortOrder="10" showInDefault="1" showInWebsite="0" showInStore="0">
                <label>General</label>
                <field id="enable" translate="label comment" type="select" sortOrder="10" showInDefault="1" showInWebsite="1" showInStore="1">
                    <label>Enable</label>
                    <source_model>Magento\Config\Model\Config\Source\Yesno</source_model>
                    <comment>
                        enable hello image.
                    </comment>
                </field>
            </group>
        </section>
    </system>
</config>
この時点で、管理画面->店舗->設定の左ナビにエクステンション名が表示され、Advancedには、エクステンションを有効にするかしないかの表示があると思います。
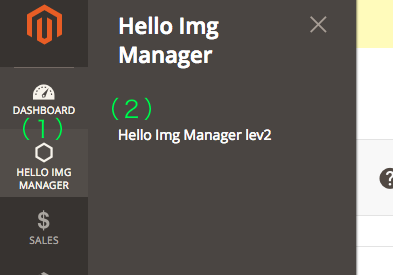
次に、下図のように左ナビにエクステンションアイコンを表示してページを表示させたいと思います。

Veriteworks/Helloimg/etc/adminhtml/menu.xml
- <menu></menu>内に<add> タグを用いることで左ナビの好きな場所に、アイコンや項目を追加していくことができます。
- idパラメータは、モジュール名_エクステンション名::XXXの形を守ってください。
- resourceパラメータは、アクセスに必要なので、ひとまずidパラメータと同じ値を設定してください。(本当は、acl.xmlでリソースを定義しますが、今記事では飛ばします。)
- 一つ目の<add>が上図(1)、二つ目の<add>が上図(2)に該当します。
- actionパラメータを用いることで、次のページへのアクセスができるようになります。現時点では、まだページを作成していないので、何も表示されません。
- actionパラメータには、routes.xmlで定義したfrontname/controller/action(controllerで対応するファイル名)
<config xmlns:xsi="http://www.w3.org/2001/XMLSchema-instance" xsi:noNamespaceSchemaLocation="urn:magento:module:Magento_Backend:etc/menu.xsd">
    <menu>
        <add id="Veriteworks_Helloimg::manager" title="Hello Img Manager" module="Veriteworks_Helloimg" sortOrder="10" resource="Veriteworks_Helloimg::manager"/>
        <add id="Veriteworks_Helloimg::add_row" title="Hello Img Manager lev2" module="Veriteworks_Helloimg" sortOrder="10" parent="Veriteworks_Helloimg::manager" action="helloimg/grid/index" resource="Veriteworks_Helloimg::add_row"/>
    </menu>
</config>
左ナビにエクステンション名を表示するところまで、終わりました。
次回は、グリッドを表示です。


